About the query method of this file:
Find the problem you encountered based on the title. If the first step does not fix your fault, go to the second step and so on. If your problem has not been resolved, or if there are other better steps to solve it, please contact us to supplement:
segway_apacme_service@ninebot.com
Thank you very much for your efforts.
1. Not hold charge / The range is short / Short battery life:
1.1 Check the air pressure, Inflate to 45 PSI (F/D Series, G65, MAX G2, F2) or 35 PSI (G30).
1.2 check the brake. If there is any friction, adjust the brake clearance according to the brake adjustment method.
1.3 Update to the latest firmware.
1.4 There are two ranges standard, Typical range and Operating condition range. Fully charged and test, provide the screenshots by APP from the battery capacity 100% to 0 or from X% to X%, then calculate the range value.
Typical range: tested while riding under full power, 75 kg (165 lbs) load, 25°C (77°F), 60% of max. speed (F Series/D Series/MAX G30)/16km/h (F2/F2 Plus/F2 Pro/MAX G2/) on average on pavement.
Operating condition Range: Simulate the actual conditions and get the range data.
|
Operating condition Range |
Typical Range |
|
Simulate riding, close to the real situation |
Uniform speed measurement, ideal riding state |
|
Working condition speed spectrum |
Ideal constant speed |
|
Item |
Model |
Typical Range(km) |
Operating condition Range(km) with the Max Speed |
|
1 |
F20 |
20 |
14 |
|
2 |
F25 |
25 |
14 |
|
3 |
F30 |
30 |
23 |
|
4 |
F40 |
40 |
29 |
|
5 |
F65I |
65 |
50 |
|
6 |
G30 |
65 |
45 |
|
7 |
G65E |
65 |
45.5 |
|
8 |
MAX G2 |
65 |
50 |
|
9 |
P100SE |
100 |
70 |
|
10 |
GT1E |
70 |
55 |
|
11 |
GT2P |
90 |
75 |
|
12 |
F2 |
40 |
33 |
|
13 |
F2 Plus |
55 |
40 |
|
14 |
F2 Pro |
55 |
40 |
※It’s only for Australia area.
For example:
F Series/D Series:
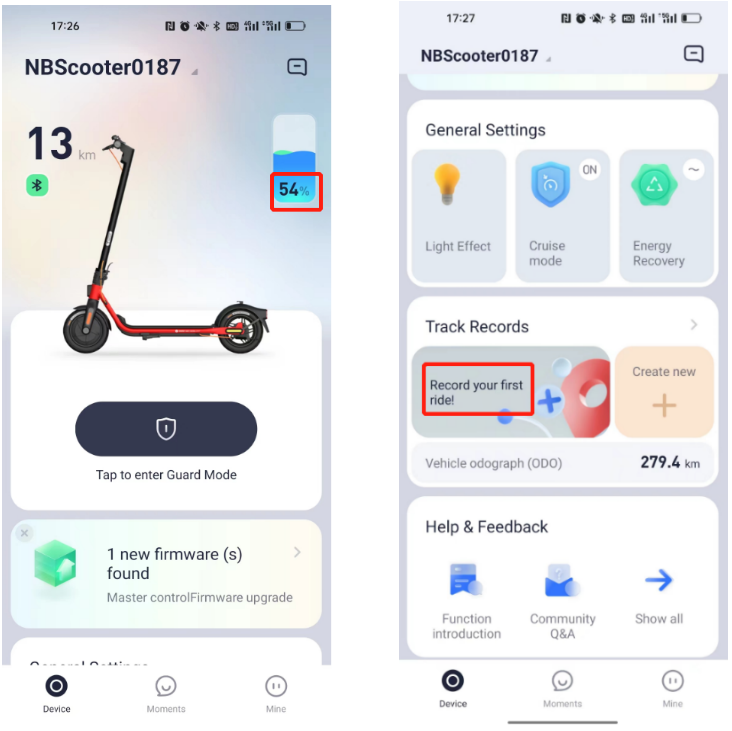
Before riding, connect to the App and take the screenshots.
Riding by 60% of max. speed / max speed of ECO mode. (max. speed 25km/h*60%=15km/h which is the max speed of ECO) on pavement.
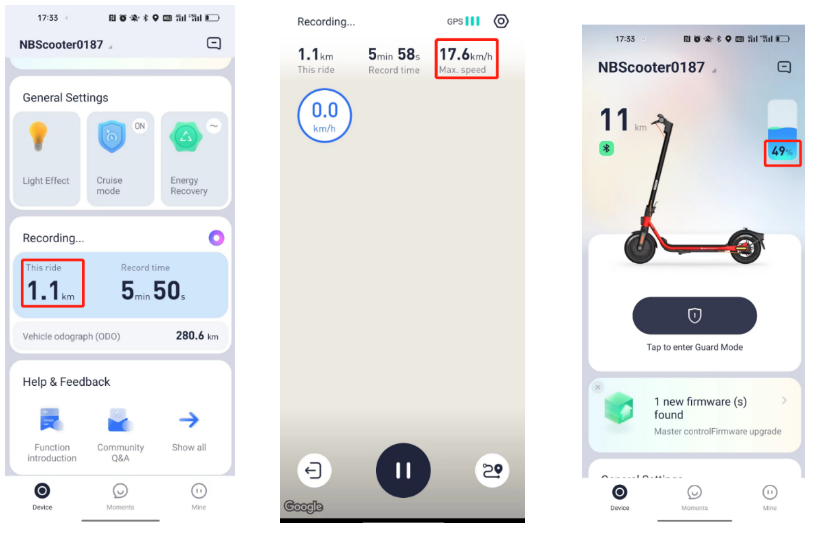
After the riding, take the screens
The range is 1.1, while battery level reduced 5% from 54% to 49%, so calculate the operating condition Range is 22 km. (1.1 divided by 5%)
1.5 Due to many factors that affect the range, such as constant speed driving, number of starts and stops, ambient temperature, etc., the typical range measured by the user may differ from the manual by about 1-2 kilometers, which is the normal value. If it exceeds this value, replace the battery.
2. The kids scooter can’t be activated and shows an alarm #24 (2 short "di" sound, 4 long "di" sound).
Need calibrate: turn off the scooter and squeeze the brake lever and press the power button for 30 seconds at the same time.
3. New Kids scooter or not new(just changed the controller) is not activated and with an alarm #30(3 long “di” sound)
For the new scooters, the customers need scan the QR code and follow the instructions to activate the scooter.
If the QR code is lost or just changed the controller, need activate the scooter by following this method:
A6: Power on the scooter, step on the rear fender for more than 5 seconds until the alarm disappeared.
C8/C10/C15/C10/E8/E10: Power on the scooter, hold the brake lever and press the throttle for 5 seconds at the same time until the alarm disappeared.
For the scooters, after activated the speed is still in limit mode and can’t change modes, ride over 1 km, the speed will reach the standard value.
4. The speed can’t reach the max value marked in the manual.
4.1. Check the screen whether it’s in Walk mode.
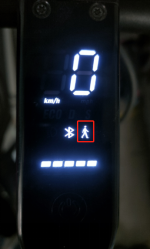
Turn off the Walk mode by APP: Settings - Walk Mode
|
Model |
ECO Mode |
D Mode |
Sport mode |
Walk mode |
|
G30 |
15km/h |
25km/h |
25km/h |
5km/h |
|
G30L |
15km/h |
25km/h |
25km/h |
5km/h |
|
Air T15 |
10km/h |
15km/h |
20km/h |
5km/h |
|
G65 |
15km/h |
20km/h |
25km/h |
5km/h |
|
E2 |
|
15km/h |
20km/h |
5km/h |
|
E2 Plus |
|
20km/h |
25km/h |
5km/h |
|
F2 |
12km/h |
20km/h |
25km/h |
5km/h |
|
F2 Plus |
12km/h |
20km/h |
25km/h |
5km/h |
|
F2 Pro |
12km/h |
20km/h |
25km/h |
5km/h |
|
MAX G2 |
12km/h |
20km/h |
25km/h |
5km/h |
|
P65A |
18km/h |
25km/h |
25km/h |
5km/h |
|
P100SE |
18km/h |
20km/h |
25km/h |
5km/h |
|
GT1E |
25km/h |
25km/h |
25km/h |
6km/h |
|
GT2P |
40km/h |
70km/h |
70km/h |
6km/h |
※It’s only for Australia area
4.2. Check the unit of speed on dashboard.
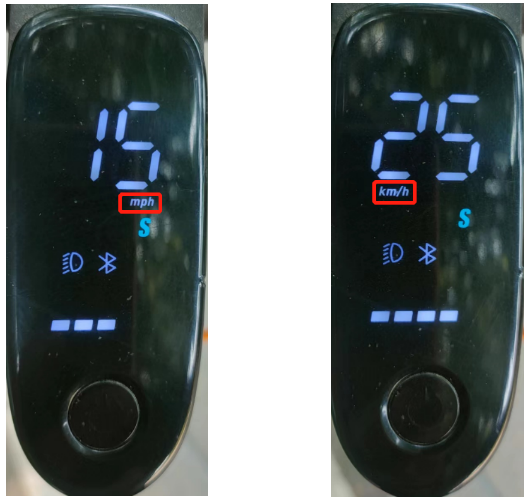
Set the unit by APP.

4.3. Check whether the scooter vibrates at the max speed, if so, check the connection between motor and controller or change the motor.
4.4. If it’s MAX G30P/G30M/G30/G30L, fully charged and check the max speed is normal or not.
When the battery level of G30 drops, the maximum speed will also decrease. When the battery level reaches 10%, the maximum speed will reach about 21. This design is to reduce battery consumption and increase the range.
4.5. Check the Serial Number by APP, compare with label under or on the side of the scooter chassis. If not same, and unallowed modification, change the controller.
4.6. When the battery level is around 25%, current limiting begins and the maximum speed is determined based on the size of the load. The larger the load, the smaller the maximum speed. It’s recommended to test the maximum speed when fully charged.
4.7. Other conditions, change the controller.
5. Can’t turn on / Can’t Charge.
5.1 Connect the charger to activate the scooter. (If there is an external battery, remove it and directly connect the charger to the scooter for charging).
5.2 When charging, check the taillight flashes or not if it exists.
|
Product Series |
Model |
Does it automatically turn on when charging |
Can it be turned off for charging |
Tail light status during charging |
|
ES |
ES1 |
Yes |
No |
X |
|
ES1L |
Yes |
No |
X |
|
|
ES2 |
Yes |
No |
Flash |
|
|
E25 |
Yes |
No |
Flash |
|
|
E22 |
Yes |
No |
Flash |
|
|
F |
F20 |
Yes |
Yes |
Flash |
|
F25 |
Yes |
Yes |
Flash |
|
|
F30 |
Yes |
Yes |
Flash |
|
|
F40 |
Yes |
Yes |
Flash |
|
|
C |
C8 |
No |
Yes |
X |
|
C10 |
No |
Yes |
X |
|
|
C15 |
No |
Yes |
X |
|
|
C15 |
No |
Yes |
X |
|
|
E |
E8 |
No |
Yes |
X |
|
E10 |
No |
Yes |
X |
|
|
Air |
Air T15 |
Yes |
Yes |
Flash |
|
A |
A6 |
No |
Yes |
X |
|
MAX |
G30LP |
Yes |
Yes |
Flash |
|
G30 |
Yes |
Yes |
Flash |
|
|
G30P |
Yes |
Yes |
Flash |
|
|
G65 |
Yes |
Yes |
Flash |
|
|
D |
D18 |
Yes |
Yes |
ON |
|
D28 |
Yes |
Yes |
ON |
|
|
D38 |
Yes |
Yes |
ON |
|
|
E2 |
E2 |
Yes |
No |
OFF |
|
E2 Plus |
Yes |
No |
OFF |
|
|
P |
P65 |
Yes |
Yes |
ON |
|
P100 |
Yes |
Yes |
ON |
If the taillight flashed as the list, it proves the battery and controller are good and the fault is caused by the dashboard fault, dashboard cover stuck or main control cable fault.
5.3 If the scooter can’t charge, first check the ambient temperature. The scooter can charge only when the temperature is 0–40°C.
5.4 Use multimeter to test the battery voltage.
|
Model |
Rated voltage |
Maximum voltage |
Discharging cut-off voltage(V) |
|
A6 |
10.8 |
|
|
|
C8/C10 |
21.6 |
25.2 |
16.8 |
|
C20 |
21.6 |
25.2 |
16.8 |
|
E8/E10 |
21.6 |
25.2 |
16.8 |
|
E2/E2 Plus |
21.6 |
25.2 |
16.2 |
|
ES1L/ES1/ES2/ES3/ES4/E22 |
36 |
42 |
27.5 |
|
E25 |
36 |
42 |
27.5 |
|
Max G30L |
36 |
42 |
27.5-28.5 |
|
Max G30/G30M/G65/G2 |
36 |
42 |
27.5-28.5 |
|
Air T15 |
36 |
42 |
25.5 |
|
F20/F25/D18 |
36 |
42 |
28 |
|
F30/D28 |
36 |
42 |
28 |
|
F40/D38 |
36 |
42 |
28 |
|
F2 |
36 |
42 |
28 |
|
F2 Plus/F2 Pro |
36 |
42 |
28 |
|
GT1 |
50.4 |
58.8 |
38.5 |
|
GT2 |
50.4 |
58.8 |
38.5 |
|
P65 |
46.8 |
54.6 |
39 |
|
P100 |
47.2 |
54.6 |
36.4 |
|
Gokart pro/S MAX |
55.5 |
59.5/63 |
41.25 |
|
S Pro |
|
63 |
41.25 |
If the battery voltage is lower than Discharging cut-off voltage, replace the battery. If the battery voltage is between the Maximum voltage and Discharging cut-off voltage, replace the controller.
6. The throttle doesn’t work.
6.1 Check whether the scooter is in P mode. (After setting the starting speed to < 3 km/h (1.86 mph), the scooter will automatically enter Parking mode (P) upon powered on and the scooter is unable to accelerate with “P” displayed on the speedometer. Rider has to exit Parking mode (P) by squeezing the brake lever once or accelerating the scooter to over 3 km/h (1.86 mph) before riding.)
6.2 Push the scooter, whether the speed is shown dashboard, if now shown, replace the motor, if shown, replace the controller.
6.3 Replace the throttle or brake lever.
7. The motor is stuck and there is resistance from the motor wheel when pushing.
7.1 Check by APP to confirm it’s locked or not.
7.2 Disconnect the cables between the controller and motor, if still the motor is still stuck, replace the motor, if not, replace the controller.
8. App can’t connect the scooter.
8.1 Check the model first, cause some models don’t support to connect with APP, like A6, C8, C10, C20, E8, E10, ES1LD.
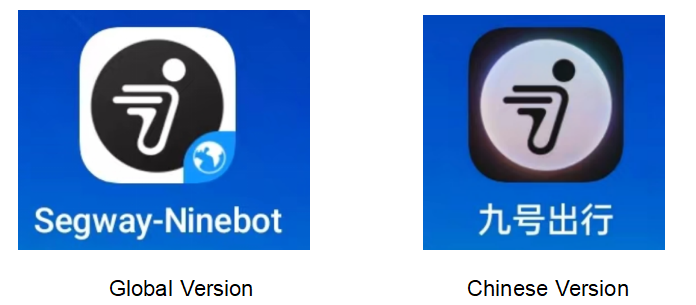
8.2 Currently there are two versions of APP: Global version and Chinese version. Please install the corresponding APP version according to the scooter version.
8.3 Network or phone system error: Check the network, change/restart the phone, or reinstall the APP.
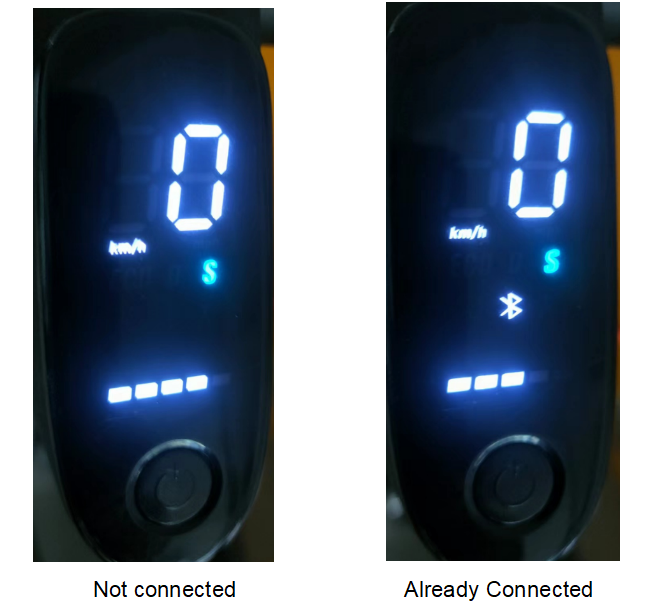
8.4 Check the scooter Bluetooth iron to confirm it’s connected by others or not.
8.5 If you are not the owner, this prompt will appear.
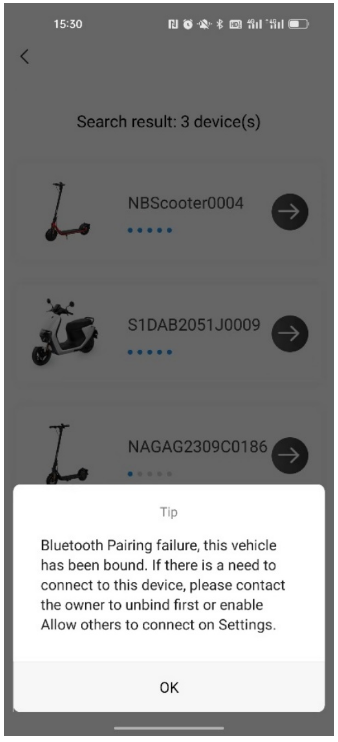
Then you need contact the owner to set the function “Allow others to connect” to be on.
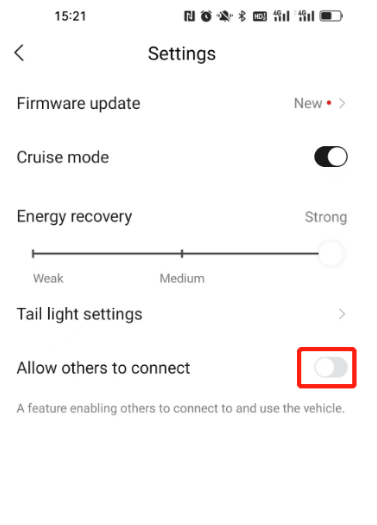
If you are the owner, please contact the nearest service center or provide the purchase proof to segway_apacme_service@ninebot.com. They will unbind the scooter for you.
8.6 Replace the dashboard.
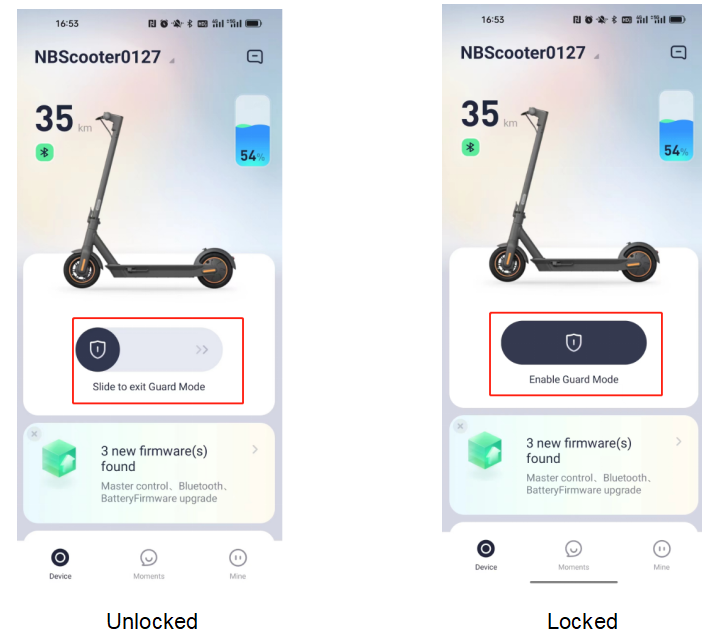
9. Can’t power off
9.1 It will not be able to power off when the unit is in locked mode. Check whether the unit is locked by APP.
9.2 Check if the dashboard cover is stuck and rebound normally. If not normal, replace the dashboard cover.
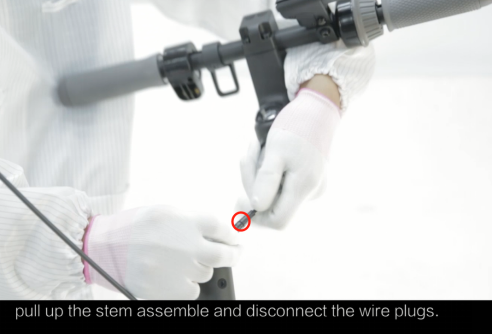
9.3 Disconnect the cable between handle bar and stem. Re-plug in to test it becomes back to normal or not. If not, replace the dashboard or controller.
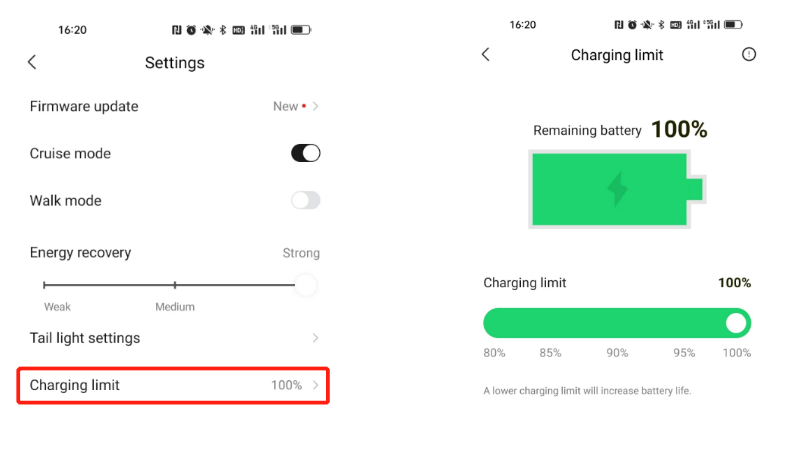
10. Can’t fully charge.
10.1 Check the Charing limit to confirm it’s 100% or not by APP. (ES1/ES2/ES3/ES4/E22/E25/F65/P65/P100/GT1/GT2/G65/G2/F2/F2 Plus/F2 Pro)
10.2 Check the charger parameter is correct or not.
|
Model |
External Charger/Power Cord Parameter |
|
ES1L/ES1/ES2/E22/E25/G30LP/AirT15/F20/F25/F30/F40/D18/D28/D38/F2/F2 Plus/F2 Pro |
41V 1.7A,70W |
|
F65/G30/G30M/MAX G2/P65A/P100SE |
1500+3pin |
|
A6 |
11.6V 1A,11.6W |
|
E8/E10 |
25.2V 0.8A,20.16W |
|
Gokart pro/Gokart pro Lamborghini/S MAX/S/S Pro |
63V 2A,120W |
|
C20/E2/E2 Plus |
24.2V 1A,24.2W |
|
GT1/GT2 |
57.8V 2A,115.6W |
10.3 Connect to the scooter by the administrator account to view battery cell voltage. Observe the difference between the highest and lowest values of 10 battery cells (the voltage difference value of the battery cells is affected by the number of battery cycles and usage time. New scooters are very small and will gradually increase with usage time). If the voltage difference exceeds 200mV (this value can be adjusted appropriately based on battery usage), replace the battery.( If there is an external battery, the built-in battery is Battery 1, and the external battery is Battery 2)
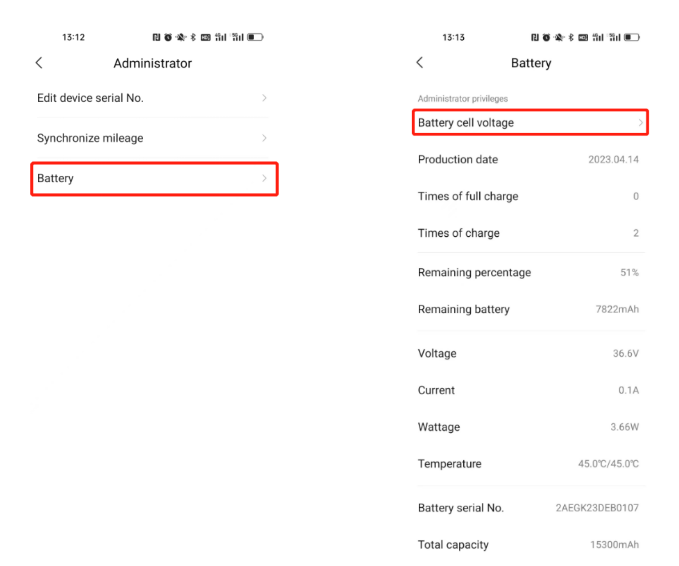
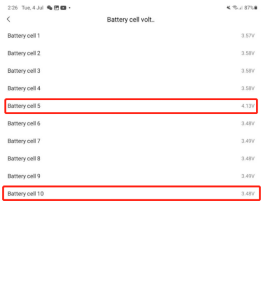
Voltage difference is 4.13V-3.48V=650mv
10.4 Replace the charging port.
11. Unable to climb.
11.1 Ensure correct tire pressure
11.2 Battery level should be above 20%.
11.3 Switch mode to S mode.
11.4 Each model has a Max. Slope standard.
|
Model |
Tire type |
Air Pressure |
Max. Slope |
|
ES1 |
Solid tire |
X |
10%(5.5°) |
|
ES2 |
Solid tire |
X |
10%(5.5°) |
|
ES4 |
Solid tire |
X |
15%(8.5°) |
|
E22 |
Solid tire |
X |
15%(8.5°) |
|
E25 |
Solid tire |
X |
15%(8.5°) |
|
T15 |
Solid tire |
X |
15%(8.5°) |
|
F20A |
With inner tube |
40–45 psi |
Approx. 10%(5.5°) |
|
F25 |
With inner tube |
40–45 psi |
Approx. 12%(6.8°) |
|
F30A |
With inner tube |
40–45 psi |
Approx. 15%(8.5°) |
|
F40A |
With inner tube |
40–45 psi |
Approx. 20%(11.3°) |
|
D18U |
With inner tube |
40–45 psi |
Approx. 10%(5.5°) |
|
D28U |
With inner tube |
40–45 psi |
Approx. 15%(8.5°) |
|
D38E |
With inner tube |
40–45 psi |
Approx. 20%(11.3°) |
|
G30L |
self-sealing tubeless tire |
32–37 psi |
Approx. 20%(11.3°) |
|
G30 |
self-sealing tubeless tire |
32–37 psi |
Approx. 20%(11.3°) |
|
G30M |
self-sealing tubeless tire |
32–37 psi |
Approx. 21% (12°) |
|
G65 |
self-sealing tubeless tire |
40–45 psi |
Approx. 20%(11.3°) |
|
MAX G2 |
10-inch Tubeless Self-sealing Tire |
42-48 psi |
Approx. 22%(12.4°) |
|
F2 |
10-inch tubeless tires |
42-48 psi |
Approx. 18%(10.2°) |
|
F2 Plus |
10-inch tubeless tires |
42-48 psi |
Approx. 20%(11.3°) |
|
F2 Pro |
10-inch tubeless tires |
42-48 psi |
Approx. 22%(12.4°) |
|
E2 |
8.1-inch inner hollow shock-absorbing tires |
X |
Approx. 12%(6.8°) |
|
E2 Plus |
8.1-inch inner hollow shock-absorbing tires |
X |
Approx. 12%(6.8°) |
The test conditions for the Max. Slope in the table are full power, 75kg, 25 ℃, climbing distance of 10 meters, with an exit speed greater than 5km/h. If the testing conditions are different, the Max. Slope will be different.
11.5 Check the vehicle temperature/battery temperature by APP, when the temperature is over 40 ℃, will limit the current of the motor, resulting in failure to climb the slope.
11.6 The power will also decrease by prolonged climbing, caused by excessive vehicle temperature. It’s a protective mechanism (controller intervention protection). This situation is relatively easy to occur in the case of long slopes. Just wait for a while until the temperature drops.
12. Error code 10.
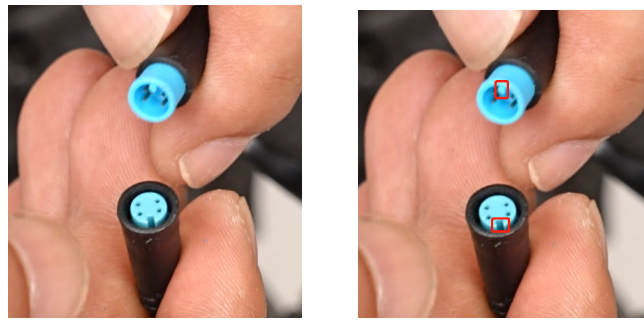
12.1 Disconnect the cable connector between dashboard and controller.
12.2 Check if the pin is skewed or not, and align the connecter groove to reconnect.
12.3 Replace the dashboard or control bus.
13. Error code 14/15.
13.1 Error code 14 indicates throttle failure, and error code 15 indicates brake failure. Do not press the throttle when powering on, otherwise the 14# alarm will appear. Do not press the brake lever when powering on, otherwise the 15# alarm will appear.
13.2 Press the throttle or brake lever to check whether the rebound is normal. If do not rebound in place, it’s possible that the screws fixing on the throttle or brake lever are too tight and should be loosened appropriately. If still not solve this, replace the corresponding throttle or brake lever.
13.3 Replace the dashboard.
14. P series NFC card lost.
14.1 Press the power button to wake up the dashboard.
14.2 Press the Left/right side of the direction indicator button (Left is minus, right is plus) to enter your passcode successively, default password 1-2-3-4. Press the multi-function button to confirm the password every time after entering. (If it’s a new scooter, connect the scooter by APP and set the unlocking password and turn on the scooter by passcode.)
https://drive.google.com/file/d/1suq7ibwex3Cpky_pPU7H4svNWT_8saFS/view?usp=drive_link
14.3 After power on the scooter, connect the APP and can delete the old lost NFC cards and match new NFC cards. Each scooter can be bound with up to 2 NFC cards.
https://drive.google.com/file/d/1PBWdsiohyeiRdnRXHw3cDISk7rlEQ1si/view?usp=drive_link
14.4 Contact Segway and provide the scooter SN, purchase two new NFC cards and send to you from factory.
15. Abnormal brake noise
15.1 Disc brake adjustment method: https://drive.google.com/file/d/1wm5BtA1bfQRPaLOzRzAPab3f1XWtiQ3R/view?usp=drive_link
15.2 Drum brake adjustment method: https://drive.google.com/file/d/1mpP9aR2Y4V7SNk55MksTwrtQRz3fnC3E/view?usp=drive_link
15.3 Replace the brake disc or drum brake assy.
16. The hook cannot be hung
16.1 Adjust the hook angle: https://drive.google.com/drive/folders/13bpag2miDqxN12SHvPmYTAx0mJXO0Su5
16.2 Or lift up or press down the fender a little, because it is plastic material, not easy to break.
17. The handlebars and wheels are not aligned.
17.1 Adjustment method: https://drive.google.com/drive/folders/13bpag2miDqxN12SHvPmYTAx0mJXO0Su5
18. How to change the tire.
18.1 F/D Series, replace by hands: https://drive.google.com/file/d/1wZ8Qk1_RGGBOjbtfKKiwlYaNltzi7MeV/view?usp=drive_link
18.2 F/D Series, replace by tools(Wrap tape/cloth around the crowbar to prevent scratches on the wheel):
https://drive.google.com/file/d/1hRTJr1Wy4yBeF9rpYk3MnZyQMZgNLppG/view?usp=drive_link
18.3 MAX G30/G65/G2, replace by hands:
https://drive.google.com/file/d/1Czw5cgN_zLFjuxwIzQY-NK1h5i9IqWi5/view?usp=drive_link
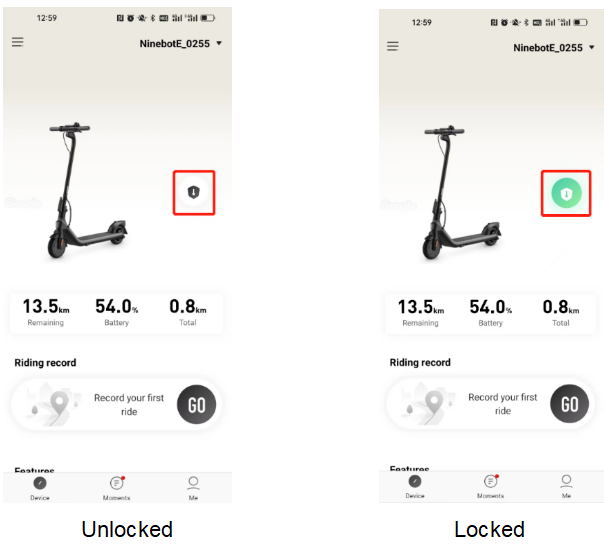
19. How to lock the scooter by APP and lock duration?
19.1 Can lock the scooter in the app.
19.2 Some models can be unlocked by setting a password through the APP.